LESSON 8: Inserting and getting a specific value into a table
The aim of this lesson is getting and inserting specifics values from and into a table on Dinamica. We will use the Get Table Value, Set Table Cell Value, Add Table Column, Set Table By Key and Get Table From Key functors and the following files:
- The IBGE crop information Table (
Guidebook_Dinamica_5\Database\Tables\IBGE_crop_information.csv) - The 1999_production_value Table (
Guidebook_Dinamica_5\Database\Tables\1999_production_value.csv) - The 1999_harvested_area Table (
Guidebook_Dinamica_5\Database\Tables\1999_harvested_area.csv.csv) - The 1999_production Table (
Guidebook_Dinamica_5\Database\Tables\1999_production.csv)
Let's go!
- From the Input/Output tab, grab a Load Table and place it on the sketch. Double click it, browse to the folder
Guidebook_Dinamica_5\Database\Tablesand open theIBGE_crop_information.csvfile.
Only multi-column CSV - comma separated value format is accepted
- The first two columns are considered the keys of the file, being used to access a certain data in the table. Click on eye button of Load Table to see the table.
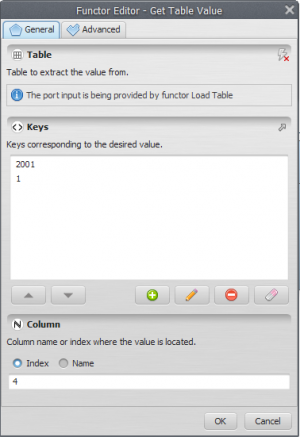
- Double click the Get Table Value to enter the keys corresponding to the sought-after values and the column name (highlighted by an asterisk). In the box Keys, enter
2001. Next, enter1(The Key to identify the wanted value on the table). Also, in the Column tab, add4, i.e., the column name or index where the value is located.
If the given keys are not found in the input table and the Value If Not Found parameter, in the Advanced Tab, is not provided, an error will be reported.
- From the Table tab, grab a Calculate Value and place it on the sketch. Assign a number to Number Value and connect the Get Table Value to Number Value. In the Connect ports window, select Value.
- Double-click on Calculate Value to add a logic or an algebraic expression. We divide v1 (the selected value) by 1000,
v1/1000, and click OK.
- From the Table tab grab a Set Table Cell Value and place it on the sketch. Connect Calculate Value and Load Table to Set Table Cell Value. In the Connect Ports window, select Value input port for the output of Calculate Value.
- Double-click Set Table Cell Value. To identify where the sought-after value is located, on the Keys input enter
2001,1(corresponding to Year 2001 and Crop 1) and add the Index4on the Column input.
- From the Input/Output tab, grab a Save Table and place it on the sketch. Connect Set Table Cell Value to Save Table, select a folder and chose a file name (e.g. IBGE_crop_information_update.csv). The final model will look like this:
- Save and run your model. Select the Save Table functor and click on the eye button to see the result.


